Each electronic sensory device is made to do carry out a specific operation: read a temperature, record the atmospheric pressure, sense an applied force, and so on. Other sensors (usually more complex) are better suited for human interfaces, calculations and/or data storage. But almost all sensors, sooner or later, need to communicate data to other devices.

A temperature logger for example needs to pass the daily logged data, rather than the current temperature, to a personal computer. Conversely, the personal computer might need to talk with that sensor in order to request the current temperature, or to specify how often the sensor has to collect the data.
Furthermore, the data collected to a single device may need to be aggregated along with data from other sensors, in order to obtain more complex information, process it with apropriate hardware and software that can make the right decisions, present it in a nice way and – why not? – share the obtained results in the web. Thus, the communication method which links sensors with other devices is thus one of the key features of any system.
Usually that communication is done through a cable, but in some cases this is not comfortable, practical or even possible. In many of these cases we could switch to a wireless solution. Wireless communication poses significant limitations when it comes to real-time data, but it is adequate and cheap for general not time-critical data exchange. In this article we introduce an example of Bluetooth wireless communication, showing the way it can be implemented with a basic example.
The Microcontroller
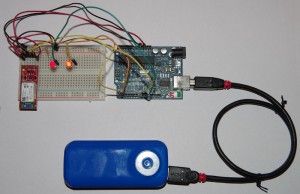
Let’s introduce a basic example on low-level side, showing a simple microcontroller configuration. In this example we will assume control of 2 LEDs in two different ways: one in an ON/OFF fashion, and the other with PWM, in order to control its brightness.

Figure 1 – A bluetooth communication prototype circuit.
To carry out this task, we used the following components:
- a power source (in this case a USB power bank)
- a microcontroller (an old and cheap Arduino Duemillanove)
- A Bluetooth modem (a BlueSMIRF Gold)
- 2 LEDs, 2 resistors and some jumper wires
You can find the detailed schematics of the circuit here.
The microcontroller receives the desired status of the LEDs via the Bluetooth modem and controls them accordingly. This is the simple Arduino sketch that does what we want. The sketch essentially reads characters from the Bluetooth modem (Serial.read), if available, until it finds a delimiter. Then it parses the received string in order to extract the desired value and apply it to the correct LED.
A message similar to “$PWM,100” will set the PWM LED lightness to the corresponding value;
– The message “$LED,1” will switch on the ON/OFF led;
– The message “$LED,0” will switch off the ON/OFF led;
– The microcontroller will reply with the executed command;
Note: Remember to temporarily disconnect the RX and TX wires from the BlueSMIRF to the Arduino, when you program the Arduino from the computer via USB.
The Android Device
There are many characteristics that makes a smartphone an ideal high-level master device:

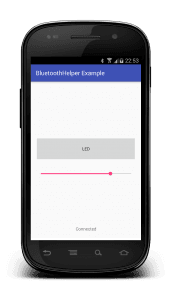
Figure 2 – Bluetooth example app
- It has great computational power
- It is suitable for human-machine interfaces
- It implements a lot of ways to communicate with other devices
- It can store and share a large amount of data
- It is relatively small and cheap
- A large amount of people has one of them and is able to use it
In this example we use an Android smartphone in order to set the microcontroller led values.
You can download the example application on GitHub. It is compatible with Android 4.0+ and is made with Android Studio.
If you want to run the test application, you have to:
- Activate the Bluetooth on your phone
- Pair the Bluetooth remote device with your Android device
- Start a new empty project, then use the manifest and the BluetoothHelperExample.java file into it
- Find the line:
private String DEVICE_NAME = "RNBT-729D"in BluetoothHelperExample.java and change the current value with the name of your paired device
- Compile and run the test app
The application automatically connects the Smartphone to the remote microcontroller and, when connected, it controls the 2 LEDs sending the appropriate command strings when the user clicks the LED button (switching the ON/OFF LED) or moves the slider (changing the lightness of the dimmable LED). In order to easily set up and manage the communication, we made a Java Helper class.
The BluetoothHelper Class
This Java Class implements an easy message-based Bluetooth wireless communication layer between an Android device (the client) and a microcontroller (the server). It is compatible with Android devices v. 4.0+.
The scope of this class is to make simple and direct the wireless communication between a low level device, that typically collects data and does simple stuff, and a higher level device that is able to present the collected data, store all the information in a file and offer the user a simple interface to send requests and control the behavior of the microcontroller.
Using this class you can Connect, Disconnect, Send String messages, Receive String messages via Listener (best way) or with explicit polling, by automatically reconnecting and checking the status of your Bluetooth connection in a simple and thread-safe way.
This class is a work in progress, some additional functions will be added in the future.The class is released under GNU GPL 3 license and freely downloadable here. Download the API documentation from here. All downloads are also available in the GitHub repository. The GitHub repository contains:
- Android/BluetoothHelper.class – The Helper Class for Android
The repository also includes the presented example, that shows how to use the helper class:
- Android/BluetoothHelperExample/ – Example app for Android
- Arduino/BluetoothHelperExample/ – The sketch for Arduino
- doc/ – The related documentation