

Find in this link the GitHub repository, free source available.
Read our Privacy Policy.
Introduction
Basic Air Data Clinometer is a simple App to measure your device’s inclination angles with respect to gravity’s direction using the onboard accelerometers.
It is a basic and lightweight App with geometric-inspired graphics that can be used as Clinometer or Bubble Level.
It is intended to measure, not store data.
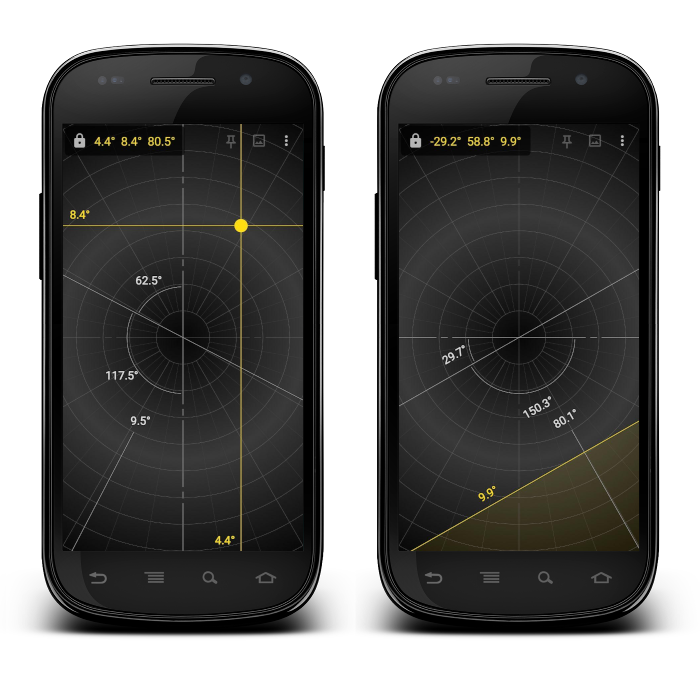
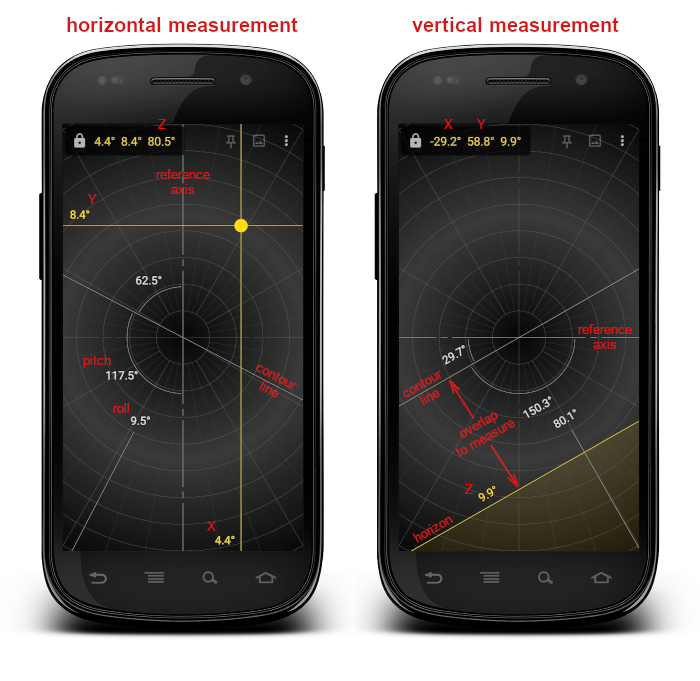
The app measures the following angles:
- X = (Yellow) – The angle between the horizontal plane and the horizontal axis of the screen
- Y = (Yellow) – The angle between the horizontal plane and the vertical axis of the screen
- Z = (Yellow) – The angle between the horizontal plane and the axis that comes out perpendicular to the screen
- Pitch = (White) – The angle between the contour line (inclined, white) and the reference axis (dashed, white) on the screen plane
- Roll = (White) – The angle between the screen and the horizontal (or the pinned) plane
Please go on Settings and calibrate it before use.
The measurement’s precision mainly depends on the accuracy of the calibration: use a good horizontal and vertical reference for calibration.
Usage
The app is straightforward. Start the App, and it will display all the rotation angles of your device in real-time.
Click the small padlock icon to lock/unlock the measurement.
Click the Camera Mode button located near the three-dot menu to switch between graduated and camera Background.
Click the pin to set the current measurement as zero pitch and roll, to make incremental measurement with respect to the pinned position.
You can anytime click on one of the main screen axis (vertical/horizontal) to set it as reference for Pitch.
Usage as Spirit Level: Lay the Device flat. The yellow cross shows the inclination of the device with respect to the horizontal plane. When the center of the cross is in the middle of the background graduation, the device is horizontal.
Usage as Clinometer: You can measure the angle of a surface by lay the device on it. The Roll will show the angle, and the Pitch will show the inclination with respect to the reference axis.
As an alternative, you can lay the device on one side (the long one should be better) and overlap the horizon (Z, yellow) with the contour line (dashed white) on the screen (this way the screen will be vertical). You should read the angle with respect to the reference axis.
Measure with the Camera: You can make vertical measurements using one of the onboard cameras. Activate the camera, then lay the device vertical by overlapping the horizon with the contour line as described above. You should read the angle with respect to the reference axis.
It is important to pay attention to place the inclined surface you want to measure at the center of the screen to avoid perspective and lens distortions.
Perform an incremental (relative) measurement: Place the phone in the first position and click the pin icon: the pitch and the roll angles (white) will be set to zero. Then move the device in the second position, to read the angular difference between the two positions. The feature can be used in both horizontal and vertical measurement, and also in camera mode.
Please note that the yellow lines still indicate the absolute angles of the device also when the pin is active.
Settings
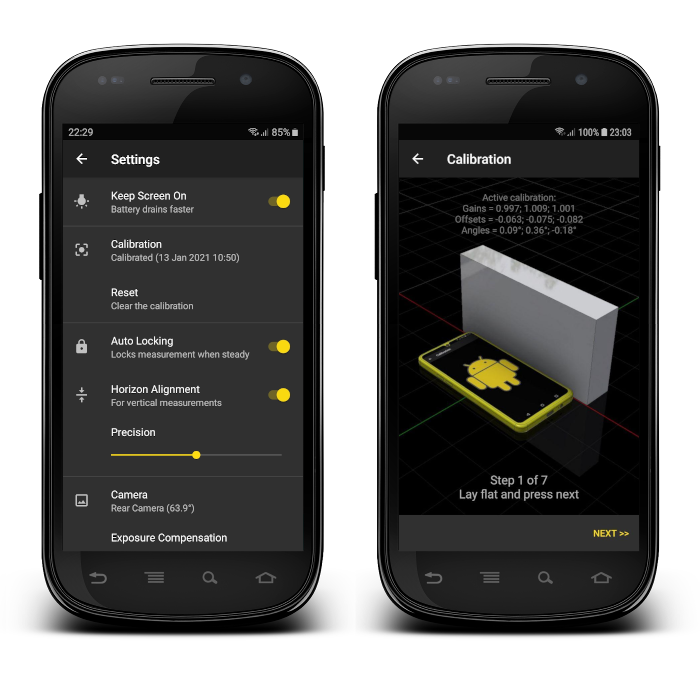
- Keep Screen On: when this option is active, when the app is in the foreground the screen always remains active.
- Unit of Measurement: set here the unit mode for angles. You can choose between Degrees, Radians, Percent, and Fractional.
- Calibration: it opens the Calibration Screen, where you can view the current calibration values and calibrate the onboard accelerometers by following seven simple steps. The calibration is really important because the precision of the measurement mainly depends on it. We suggest doing the calibration before starting using the app.
- Reset: use it to clear the current calibration.
- Auto Locking: when the Auto Locking is active, the measurement is locked only when the device is enough still. In other words, on the main Activity, clicking the padlock icon does not lock the measurement until the device is still.
- Horizon Alignment: activate it to add the overlapping between the contour line and the Z-axis (Horizon) as condition to lock the measurement. The Horizon Alignment is active only for vertical measurement, when the Z-axis is less than 5 degrees from the contour line.
- Precision: With this slider, you can set the tolerance of the Auto-Locking. Slide it right to require a high steadiness (and, if the previous setting is active, horizontality). Slide it left to be more tolerant.
- Camera: here you can select which onboard camera to use for Camera Mode.
- Exposure Compensation: an extra setting in order to have a more readable screen in camera mode, by darkening or brighten the camera live view. Not all cameras support the exposure compensation: if unsupported, the slider will be disabled.
- Info: the about screen of the App. It shows the app’s version and the information about the License.
- Online Help: the link to this page.
Calibration
The calibration of the onboard accelerometers is essential to have good measurements. The measurement’s precision mainly depends on the accuracy of the calibration: find a good horizontal and vertical reference for calibration.
If your device has protruding side buttons, we suggest finding something to compensate them (like a thickness to keep the device raised).
Go to Settings and click Calibration. A new activity will appear. Follow the 7-steps guide to perform the calibration. Pay attention to lay correctly the device on all the steps, by following carefully the on-screen images and descriptions.
You can anytime clear the calibration or start a new one in case of needs.